April 30, 2011

Book Review: The Serpent on the Crown by Elizabeth Peters

The Serpent on the Crown (An Amelia Peabody Mystery, #17)The Serpent on the Crown by Elizabeth Peters

My rating: 4 of 5 stars


I love the Amelia Peabody series, so fun and the mystery usually keeps me guessing until the end.  I listened to this one on audio during a long car trip.  The reader/performer (Barbara Rosenblat) did an absolutely fabulous job.  She is now my #1 favorite audio book reader.  I don't know how many different voices she did in this book, dozens it seemed.  All distinct, with different accents, inflections, gender, etc.  I was really impressed.  Read this series if you want a fun mystery and listen to them if you get a chance.  You won't regret it.


View all my reviews

April 28, 2011

My First Quilt: Part Two

Step 4:  Binding.  I cut a 2.5 inch strips and machine stitched them together, long enough to go around my entire quilt.  You can always cut off any excess binding at the end, so better to have extra than not enough if you are nervous about it.

Take your 2.5 inch binding and iron it in half.  You now have a folded 1.75 inch binding. 

Attach your binding to your quilt.  Do not start at a corner.  Your binding should have your folded, ironed edge on the inside of the quilt (left side in this picture).  My raw edges of the binding are matched up to the edge of my quilt and sewn with about a 1/4 inch seam.

As you reach the corner of your quilt, stop about 1/4 inch from the end.  Cut thread and fold your binding into a triangle (see picture).   Holding corner as you folded it, begin sewing down your next side of the quilt.  Repeat on all four sides and corners.

Here is a better shot of the corner.  Clip your corners carefully when you are done sewing so they lay a little better.

Here is my quilt with the binding sewn around the entire top of the quilt, using the machine.

 For the back of the quilt, I used binding clips (they look like hair clips but are a bit different) to fold over the binding and hold it in place while I hand stitched it to the back.  I used the same quilting thread, but doubled it so it's nice and strong.

Your corners will fold over nicely as well, thanks to the way you machine stitched it on on the front side.

Just FYI, here is another picture of the binding after you fold your triangle and continue machine stitching.  It's a bit blurry, but you can see me holding up the folded triangle part.

All of my pictures were taken very hastily, I apologize.  I was in a bit of a time crunch to get this done so I could do the hand stitch binding part in the car on the way to Grandma and Grandpa's house.  There are some fabulous quilting tutorials out there, much better than mine.  Google around if you are interested.  These pictures are more for me so I don't forget what I have already learned.  Visuals always help me retain information better.

Detail of machine quilted top.

Top of quilt and binding detail.

Back of quilt with hand stitched binding.

And for laughs, here is one attempt at me trying to get some pictures of the finished quilt at my mom's house.  Someone kept getting in the way.  I have about 20 pictures like this.

My youngest in the way again and my quilt holder peeking over the top. (and yes, my kid does have other shirts.  He insists on wearing only one or two favorites for weeks at a time though). 

A big thanks to Vickie (my instructor and hand model) while I made this quilt.  There is NO WAY I would have gotten this thing put together without her.  There is a "thank you" gift in the works for her, and no, it is not a quilt.  She is much more competent than I in making her own quilts, and they are gorgeous.

April 27, 2011

My First Quilt!

I finished it up over spring break week while visiting family.  So nice to say I finally finished a quilt!  Now, I get to make a matching one for the other bunk bed.  A little difficult since my sewing machine is dead....but Mother's Day is coming up soon.  A girl can hope, right?

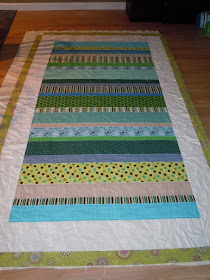
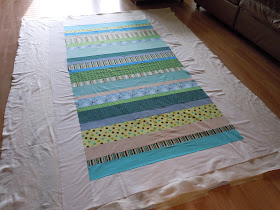
Step 1:  Make a quilt top.  Make whatever quilt top you want in any size you want.  I chose to do an easy strip quilt after falling in love with the quilts I saw HERE.
Pick out your fabric, cut your strips, lay them out and change your mind a million times until you like your design.

Sew those strips together.  Iron and decide that you love it even if you would change a couple of spots, because you are NOT going to unpick it and start over.  No.

A great tutorial HERE with detailed instructions on making a strip quilt top.

Cut selvage edges and make your strips nice and even.  Not all bolts are created the same length. 

I didn't want a border, but ended up adding one because my strips weren't long enough to cover the sides of the bed.  I chose a soft, white muslin.  I cut my border strips just long enough to cover the sides of the bed without having to tuck.  For me, tucking blankets on a bunk bed is akin to squirting lemon juice in my eye.  Actually, that's what started this whole process in the first place.  (Hating the daily tucking of blankets on the bunk beds, not squirting lemon juice.)   Now, all I have to do is spread the quilt out and the bed is made.  My kids may actually be capable of making their own beds now.  Once again, a girl can hope.

  Step Two:  Quilting.  Now we are onto the actual quilting process.  My backing was a soft, flat sheet that my boys love.  Tape it to your floor, nice and tight.  If you have a nice, big table, do it on that.  I am not so fortunate, so the floor it was.  Most people use quilt fabric for their backing too.  I was cheap and used a flat sheet this time.

Lay down batting, and then your completed quilt top, centering on your bottom backing layer.

Step 3:  Pin until you are cross eyed.  This is a good time to pop in a movie or listen to an audio book.  Save your aching fingers and pick yourself up one of THESE to close the safety pins.  You can also use the handle of a spoon.  I highly recommend curved safety pins as well.  Pins need to be no further than 4 fingers apart, all over the quilt.

After basting (aka: pins all over quilt), cut excess batting and backing layers, removing tape as you go.  You don't want to get right up against your quilt top when you cut yet.  Leave a little excess on all sides for now.

Start quilting!  Use a walking foot on your machine and use good, quality thread.  I stitched straight lines on the strips and a triangle pattern on the border.  For the sake of my sanity, I kept it really simple my first time around.

After all quilting is done, remove all pins and cut excess backing and batting with a sharp pair of scissors, so it matches your quilt top.

Next step:  Binding.  Stay tuned.

April 23, 2011

Book Review: The Saturday Big Tent Wedding by Alexander McCall Smith

The Saturday Big Tent Wedding PartyThe Saturday Big Tent Wedding Party by Alexander McCall Smith

My rating: 3 of 5 stars


Another fun installment in the No. 1 Ladies Detective Agency.  I enjoyed this book much more than the last one.  There is some closure and happy endings for a couple of the characters that I have been wanting for a while...don't want to give too much away though.  I'm sure Smith will write more in this series (he describes himself as a serial novelist), but I would be happy to stop with this one if necessary.  Start at the beginning with this series if you are interested.  Light, fun, thought provoking at times, and full of Botswana life.  I can feel the dry air and smell the red bush tea at times....


View all my reviews

April 20, 2011

Book Review: Juliet by Anne Fortier

JulietJuliet by Anne Fortier

My rating: 3 of 5 stars


This was a fun, but long book.  I feel this could have been shortened somewhat and still gotten the same amount out of it.  The story of Julie Jones, who discovers that her aunt has been hiding a lot of old family secrets from her and her twin sister.  A trip to Italy brings enlightenment, danger, romance, and a lot of Italian history...especially to the story of Romeo and Juliet.  The book goes back and forth from Julie's present day story and reading notes from a manuscript written in the 1300's about the true story of Romeo and Juliet.  For most of the middle of the book, I was much more interested in the Romeo and Juliet story, as the present day story was dragging along.  The ending was a bit over the top for me, but still fun and who doesn't love a happy ending?  If you are a history buff or really love Shakespeare, this would be a fun one to read.  I want more than ever to visit Italy after reading this one.


View all my reviews

April 16, 2011

Book Review: Fablehaven by Brandon Mull

Fablehaven (Fablehaven, #1)Fablehaven by Brandon Mull

My rating: 2 of 5 stars


I can't believe it's taken me this long to read this series, but here I am, finally getting around to it.  I liked this book and would give it 2.5 stars.  The book took too long to get going for me, but you have to keep in mind the target audience that this book is written for...and that is not me.  A cute story about a brother and sister who go visit their grandparents in the middle of nowhere, only to discover a whole fantasy world right outside their back door.  I have heard that the series matures and gets better and better with each book, much like Harry Potter.  I am willing to read on if that is the case.  If my kids get into Harry Potter someday, then this would be another series that would be fun for them to read as well.  I think I'm going to take a break for now, but will probably come back to this series in the near future.


View all my reviews

April 13, 2011

DIY Fabric Canvases

Wanted to add some splashes of color down my hallway.  I know, my house needs more color.  It's so bland.

Found these awesome fabric frames at IKEA months ago and finally got around to doing what I wanted to do with them.  The product is called Tyglosa and I can't find them anywhere on their site anymore, nor at my local store.  I did a search and no one seems to be selling them anymore.  Bummer.  You could easily do this with any kind of frame or even cover an actual paint canvas.
Assemble your frame and iron your fabric.  Cut to size.  You want your fabric to cover the entire front of frame, the sides, the back (where you staple it), and little extra....just in case.

IMPORTANT:  DO NOT use a hammer and nails to attach your fabric. (The kit came with little tiny nails when I bought it.)  You will not only waste copious amounts of time, but you will probably hit yourself with the hammer while trying to hold the little nails in place.  You may say a few choice words.  You may want to cry.

Not that I have any personal experience with this kind of situation.

No, please save yourself the trouble and use a staple gun.  I love mine.  Nothing fancy, but it works oh so nicely.  Hammer and nails = 1 hour (with pauses for cursing and sucking on hammered fingers).  Staple gun = 15 minutes (while singing along to my iTunes playlist).  You do the math.
Ok, so get your staple gun and go crazy.  I usually work in opposites, meaning I put one staple in on one side and my next staple is on the opposite side of the frame.  I work my way around the frame pulling the fabric as taunt as it will go, stapling the poor fabric to death.

Don't know if I am explaining this very well.  Think of my frame as a compass.  My first staple is due north, right in the center.  My next staple is due south, pulling the fabric as tight as it will go against the north staple.  Next staple is east, and then west.  Back up to north, moving over a few inches from my first staple and repeating the whole process until the fabric is tight against the frame everywhere.  Don't worry about the corners yet.

Here you are after stapling everything except corners.

Fold your fabric nicely, like a present around the corners and staple them into place.  Use as many staples as you want, just only on the back of the frame.

Cut excess fabric.

Done.
You could play the snare drum on this thing.

Ignore the ugly doorbell cover.  Still working on that one.

And here is a shot of my laundry basket, full of dirty laundry being used as a place to set down my level while I hang my fabric canvases.  People ask me how I have time to do all of these fun projects.  There, my friends, is your answer.

April 12, 2011

Book Review: The Glass Castle by Jeanette Walls

The Glass CastleThe Glass Castle by Jeannette Walls

My rating: 4 of 5 stars


Wow, this was quite the book.  The true story of the author's childhood growing up with two very unique, and many ways negligent, parents.  This book is hard to read at times.  The amazing thing about it though is despite the horrible situations these kids go through, you somehow still walk away with a strange feeling of hope.  I don't know how to explain it other than it takes a special writer to be able to pull of accounts of so many bad childhood memories and have the reader not feel completely depressed and upset at the end of it.  Not everything in the book is bad.  Like so many things in life, it all depends on your perspective.  This is a fabulous book for a book club discussion, highly recommend it if you are able to stomach some not-so-pleasant situations.


View all my reviews

April 10, 2011

A Sneak Peek


Putting together my first strip quilts.  I'm making two for my boys bunk beds.  The quilt tops are done...but I've never actually pulled it all together and finished a quilt.  Thankfully, I have some very talented friends with lots of quilting experience.

More pictures to come.

April 9, 2011

Book Review: The Red Pyramid by Rick Riordan

The Red Pyramid (Kane Chronicles, #1)The Red Pyramid by Rick Riordan

My rating: 3 of 5 stars


I loved the Percy Jackson series and was really looking forward to reading this next book by Riordan.  It's the same basic premise of the Percy Jacksons, just with a brother and sister team and Egyptian gods/monsters/magical beings instead of Greek and Roman.  I didn't enjoy this book as much at the Percy Jacksons, but that may be because I am not well acquainted with Egyptian folklore.  The book took a long time to get going in my opinion and, if not for the ending, would have been a bit of a disappointment.  The ending did save it for me though, it was a fun and a bit unpredictable.  Overall, I'm glad I read it and can now recommend it to my boys when they are a little older.


View all my reviews

April 6, 2011

Cake Stand Makeover

My mom gave me some tiered glass cake stands a while back.

She bought them at a clearance sale and two of the stands had some nasty glue stuff on them where the top meets the pedestal.  No amount of cleaning or de-gluing removed the nastiness.  I tried, trust me.  I ordered some glass etching vinyl for my Silhouette a while ago, and thought this would be a good time to try it out.

Ahhh....much better.  You can still see the glue if you look close, but it is a vast improvement.
This is the top tier.

Middle

Bottom.  This tier miraculously did not have any glue on it, so I was able to leave the middle vinyl free.  I still might add a little something to this one, not sure yet.


April 1, 2011

Preschool: the letter "J"

Jello Jigglers
(the kids were happy to play but refused to eat them)

Make your own Jack-o-lantern face

Jellyfish