Showing posts with label Valentines. Show all posts

February 21, 2013

Homemade Fortune Cookies

Valentine's Day crafts and gifts were very simple this year.  We bought some small whack-a-pack Valentine balloons and made a custom label that said, "My Heart Pops For You!"  Of course, I forgot to take a picture.  We did manage a little homemade project of fortune cookie making, thanks to a recipe my 3rd grader brought home from school.

I added the chocolate drizzle using melted almond bark and a squeeze bottle.

Oh, if only this was TRUE!


Homemade Fortune Cookies:

4 TB softened butter
1/3 cup sugar
2 egg whites
1/4 tsp salt
1 tsp vanilla extract
1/3 cup water

fortunes, cut and ready to go

Preheat oven to 375.  Use a well greased baking sheet or a silicone mat.  In a large bowl, mix the butter and sugar until fluffy.  Add egg whites, salt, and vanilla.  Beat until smooth.  Stir in flour and water until combined and smooth.  With spoon, scoop out an even spoonful of batter and carefully pour onto baking sheet.  Use the back of spoon to form a circle about 3 inches in diameter (I made mine a little bigger).  The batter should be thin, almost transparent.  Do not pour more than 5 on a baking sheet at a time.  You will have to work quickly to shape the cookies before they harden.  Bake for 6-7 minutes, until edges are golden brown.  Pull out of oven, place paper fortune on one half of cookie.  Fold over so the cookie is in the shape of a semi-circle.  Gently fold over again, so the cookie can stand up on the open edges (see pictures).  Let cool.  Cookie will harden slightly as it cools.  Drizzle with chocolate, yum!

Valentine's Day and Chinese New Year have both come and gone, but maybe there is another holiday you can celebrate by making these simple, easy cookies.  You can customize a message inside to say anything!  My boys would love these with some fun birthday wishes or even some funny jokes inside.


February 8, 2012

Valentine Printables for 2012


"You're just WRITE for me" valentine made by me, inspired by Disney Family Fun


(my chocolate heart is a little too big for the "O")

"Eyes On You" made by me, inspired by AR Mommy


back

girl version


And, because I'm awesome, I forgot to take a picture of my version of this one.  It was too cute not to include though.


I made all of these for a RS activity night, hope everyone enjoys them and makes some cute Valentines this year.  If you have any questions or problems with any of the links, please leave a comment and I'll help you out.

February 11, 2011

Valentines 2011 Wrap Up

My YW made a bunch of these for our mid-week activity, just in time for Valentine's Day.  I found the tutorial HERE and we couldn't resist.  The girls really liked them.


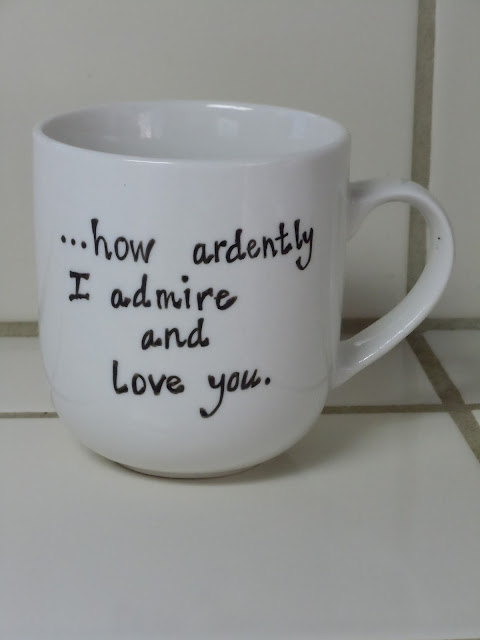
My bookclub is doing a Valentine gift exchange this month.  We have to choose an object to represent one of our favorite books, $10 or less.  I chose Pride and Prejudice (as if there was ANY other choice), bought a cute mug, a Porcelaine pen at Michael's, and wrote one of the most famous quotes from the book on it.  Stick the mug in the oven at 300 degrees to set the ink and your are done!  This idea was a combo from HERE and HERE.  For my first try, I'm pretty happy with it.  I think with some practice I could make some really cute teacher/friend/birthday gifts.

That's it for me and Valentine's Day this year.

I promise.

February 9, 2011

Class Valentines 2011

All three of my boys are in some kind of classroom this year, and that means making Valentines for a lot of people.  I'm not a big fan of the store bought kind, although I have used them in the past.  This year, we've managed to get ahead of the game a bit and make some handmade Valentines.

FOR THE FIRST GRADERS:
(photo via Skip to my Lou)

Alas, these Valentines were already sent to school to be put in the big Valentine class box and I forgot to snap a picture of our version.  We found this great template at Skip to my Lou and my six year old had a great time cutting out the wings and writing his classmates' names on them.  We changed it a bit and wrapped each lollipop top with black tissue paper and added pipe cleaner antennas.  We also did orange and blue wings for the boys in case any of them thought these were too "girly".  That's a big deal in first grade, ya know.


FOR THE PRESCHOOLERS:


I fell in love with this idea as soon as I saw it on Thirty Handmade Days.  Great for my younger two who go to autism and speech therapy preschools, both classes which are all boys.

I love the back of the label with the tire tracks.


FOR THE TEACHERS:
Took my bottles from Austin and Tyler's birthday party (the snowmen), washed them out, filled them with candy, spray painted the lids, and added a ribbon with a tag.  Wanted a little something more on it....

There, much better!  Cream vinyl heart cut from my Silhouette.  We are ready for the class parties to begin.

February 6, 2011

Mini Valentines Cupcakes

I made these last week for my YW girls activity.   Deceptively simple to make.

Vanilla cake mix cooked in mini cupcake pans.  Canned chocolate frosting, microwaved for 30 seconds.  Dip the top of each cupcake in the melted frosting and cool until set.

 I had some red fondant left over from my boys' birthday train cake, so I pulled it out thinking I would make some cute Valentine hearts.  I didn't have a small heart shape cutter and I wasn't about to cut out a bunch of hearts by hand....so I improvised.
I found a small leaf cutter amongst my stash.  Roll out your fondant with powdered sugar and cut our your leaf shape.

Take a small, sharp knife and cut out the stem part of the leaf.  Discard the small stem piece and now you have the rough shape of a heart.

Shape your cut out with your hands until it's a cute little heart.

 
 Top your cupcakes with your hearts and you are done!

 Looks like I spent all day in the kitchen when I really spent less than an hour...with baking time!  The girls loved them and they were gone in minutes.  Happy Valentine's Day everyone!

February 9, 2009

Valentine Sun Catcher Craft

My four year old and I made these fun Valentine hearts today.
Supplies:
crayons with the wrappers off
pencil sharpener
wax paper
iron and ironing surface
2 sheets of thick paper or cardboard
scissors and heart stencil (or free hand it)
small hole punch
twine and tape for hanging

Start off with a piece of wax paper, folded in half and then open back up. Place one sheet of cardstock or cardboard underneath wax paper to protect your working surface from the heat of your iron.

Unwrap your crayons and get shaving! Scotty could do it but it took him a long time, so I would take over periodically.

Spread your crayon shavings over the wax paper, but not too thickly. You can do color combos (these were Scotty's choice) or you can do one solid color.

Fold over wax paper and crimp edges.

Place cardstock or cardboard on top and iron on medium heat. My cardboard was pretty thick so I did about 15-20 passes. Keep the iron moving and check every once and a while on your progress.
(Sorry, forgot to rotate this picture)

Voila! Good color choices, very camo-like.

Let cool completely (30 seconds was plenty for us) and cut your your heart with scissors.

The wax paper fuses together really well, so there's no mess since they can't come apart.

Punch a small hole in center and thread with red twine. Hang in a window that gets lots of light with tape.
Happy Valentine's Day!
Related Posts with Thumbnails