December 22, 2009

Christmas Baking


Presents have been bought or made, wrapped, and shipped. Now it's on to the baking. Many a loaf of poppy seed bread has been made this year. I wrapped them in plastic and then festive tissue paper with a cute tag. We're starting to pass them out to friends and family. Three batches of my mother-in-law's fabulous english toffee has been made also. I'm trying not to eat all of it before my family gets here.
Still to bake:
Chocolate silk pie
My dad's favorite raisin cookies
shortbread (recipe HERE)
peppermint fudge
chocolate truffles

I don't know if I'll get to all of it, but I'm sure going to try! I'll try to post pictures and recipes as I go. Happy baking and MERRY CHRISTMAS!

December 17, 2009

Dollhouse....DONE!

So, way back when, I made a FABRIC DOLLHOUSE for my niece for Christmas. I finally finished the embellishments on it tonight. I really had grand plans for more....but time is running short, so maybe next time I'll put in a rug or a fireplace, and maybe a pond.

What is a dollhouse without some dolls? I painted and sealed these little wooden dolls for her. She has two sisters, so I thought three little kids would work for this doll family.

Admiring their new garden.

Merry Christmas, my dear!

Oh, and here's the outside. Next time, I'll add on some windows with little curtains. Ahhh, I need more time!

December 16, 2009

Scarves

I made two-toned fleece scarves for family and friends this Christmas. They were a lot of fun to make and very warm. My brothers are getting their favorite sports team colors.


I also made some cut fleece scarves, just for fun. These were secret Santa gifts at various parties this year.

My five year old wanted one too. He chose the colors so I knew he would like it and now he wears it to school every day.

December 9, 2009

Ripped Strip Christmas Trees

I have a very talented cousin (in-law) who hosted a craft night last week. We all came home with three cute Christmas trees made from ripped strips of Christmas fabric. She gave me permission to post the instructions and pictures of our trees. Thanks again, Cami! We had a lot of fun.

We used a cross section of real wood, drilled and fitted with a painted wooden dowel. Start each tree a few inches up from the bottom and tie a strip to the dowel. Hot glue in place. Tie the rest of your strips above the hot glued strip, starting with the 15 inch strips and working up to the 7 inch strips. Turn the knots and push strips down as you go so the knots are not all on one side and they are nice and compact. Only hot glue the first strip,the rest can just be tied on the tree (I double knotted) without glue. Allow 3 inches of dowel or so at the top of your tree to hot glue the star. Trim any strips or stray threads with scissors that you don't like, and viola! Cute Christmas trees are done!

Here is what you need:

6 fabrics, 1/2 yard each (each fabric will be about 18"x42")
16", 20", and 26" dowels
3 pieces of wood with hole for dowel or other kind of base
3 stars or toppers
hot glue gun
scissors

Cut each fabric into 18x15, 18x12, 18x9, and 18x7 inch pieces.
Clip up an inch into fabric every inch along 18" sides. Tear fabric into strips with hands.

Small Tree- 16 inch dowel (bottom to top):
3- 15 inch pieces of each fabric (3 strips x 6 fabrics = 18 strips total)
4- 12 inch pieces of each fabric
4- 9 inch pieces of each fabric
2- 7 inch pieces of each fabric

Medium Tree- 20 inch dowel:
6- 15 inch pieces of each fabric
6- 12 inch pieces of each fabric
4- 9 inch pieces of each fabric
3- 7 inch pieces of each fabric

Large Tree- 26 inch dowel:
9- 15 inch pieces of each fabric
8- 12 inch pieces of each fabric
8- 9 inch pieces of each fabric
4- 7 inch pieces of each fabric

Total for all three trees:
18- 15 inch pieces of EACH fabric
18- 12 inch pieces of EACH fabric
16- 9 inch pieces of EACH fabric
9- 7 inch pieces of EACH fabric

FYI: I had extra strips left over, so this is just a basic guideline. The amount of strips on your tree depends on how tightly compacted you can get them.

Leave a comment if you have questions!

December 8, 2009

Cupcake Train

Two of my boys' birthdays are just a month apart, with Christmas in between. While they're young (or until they start protesting) we are doing the combo birthday thing. They are turning 2 and 3 this year.....so I'm pretty sure they don't mind.

They are both in love with Thomas the train and I didn't have time to do a large Thomas the tank engine cake with fondant and all of the works, so we opted for a simple but adorable cupcake train.

We jazzed it up with a cheap "grass colored" tablecloth and laid "track" down using black electrical tape.

I bought a blue tablecloth and cut out a lake, just for fun.

My platform cars were made with marshmallow wheels, a toothpick in between to hold them together.

Two sets of wheels glued to a graham cracker with frosting. For best results, let dry overnight.
(Not pictured: I glued on Oreos to the marshmallows to make the wheels more prominent. You could just leave the Oreos off and just stick with the marshmallows too)

I bought those silicone cupcake liners and I loved them. You could do regular round cupcakes too.

Line them all up, and there you go! The boys loved it. The Thomas engine is a bath toy and I got the "Happy Birthday" candles at Walmart. This whole thing took about 2 hours to put together and had just as much wow factor as a 3D Thomas cake (which would have taken me at least 2 days). Happy Birthday A and T!

November 30, 2009

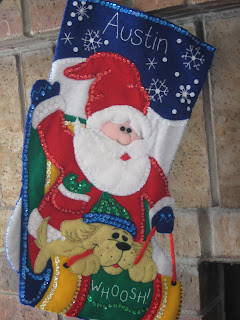
Christmas Stockings

Hallelujah! I finished my youngest child's stocking last weekend! A four hour marathon sewing session while I watched college football was all I needed to get this baby completed. The only reason that block of time was available was due to my youngest two taking unusually long naps, and my fantastic husband keeping my 5 year old entertained. Dinner was not made this night (we ordered pizza), but that stocking is DONE!


The others I have done through the years.

And the one that started them all. My mom made this for me and let me take it with me when I started my own family. Perhaps I'll make myself a new one eventually so she can keep this one on her mantle. For now though, it's with me....and in good company with the other handmade stockings.

November 11, 2009

Quilt Class: Week 9

Circles! I know, crazy! How do you quilt circles, you ask? Magic, I tell you....MAGIC! I cannot begin to explain because, quite frankly, I'd probably just thoroughly confuse you, but let's just say it involves freezer paper, fabric glue stick, a zipper foot, and a compass (the circle drawing kind, not the one that points north). Please excuse my creased quilt square. I didn't iron it before I snapped the picture. Oh, this class is the BEST!

November Sampler

Some baking: pumpkin pie and Muddy Buddies. My 5 year old helped with both of these. He loves to bake with me, so Santa is going to slip a child size rolling pin into his stocking this year since he has a hard time using my big one.

Our Thanksgiving Turkey Countdown. Each day, we remove a feather and briefly talk about why we are grateful for the item listed. My 5 year old came up with all of the topics on the feathers on his own. It's been a good conversation starter and the younger siblings haven't tried to rip him down yet, hooray!

November 3, 2009

Fabric Dollhouse

I have been really wanting to try my hand at one of these for a while now and I'm so glad I finally got a chance make my first fabric dollhouse. I found the tutorial for it HERE and am planning on making a few of these for Christmas gifts....I won't say who just in case there is a chance of them reading this and finding out!

So, you have a cute little, soft fabric dollhouse with buttons holding one side up. Undo the buttons and.........

A little indoor/outdoor dollhouse all ready to be played in! Aren't they adorable?

I'm going to add some flowers and maybe a little walkway on the grass. And I still need a door and window on the outside of the house too.

Another way to use this is to just button up the sides (or just sew them together for an older girl who won't use it for playing with dolls) and use it as a purse. Way cute! I'm itching for a good chunk of time when my kids are asleep so I can make some more!

Quilt Class: Week 7 and 8

I missed week 7 due to illness, so this week I'm back and ready to quilt!

The lesson I missed was on hand applique and this week was iron-on applique. I really like this simple square and would love to make a bunch of these for a baby quilt in pinks and browns and greens. Maybe I can squeeze it in sometime....

This process is very similar to the baby onesie applique I've done numerous times. I zig-zag stitched around the white petals, but still need to do the purple. Simple and sweet.

October 20, 2009

Quilt Class: Week 6

Here is the lovely Ohio Star square.

And this is called the Swamp Angel. No, I don't know why it's called that, but I feel bad for this square to be so cute but to have such a unpleasant name. The concept for this week was to learn quarter-square triangles. I love learning these techniques because you don't waste any fabric when you make them...and who doesn't love that?

October 19, 2009

Quilt Class: Week 5

I'm way behind due to illness (my kids' as well as my own) and just finished last week's squares tonight. Here is the Dutchman's Puzzle. It was deceptively difficult, using large half-square triangles.

This is the Bear's Paw pattern. It's actually four "paws" put together to make the square. Each of those little squares are 2 inches, plus all of the half-square triangles in there....this one was a lot of sewing! I really like the look of it though, lots of fun pattern possibilities with this one.

I've cut out my fabric for tomorrow's class so I can sew more squares. Whew! I think I need to go to bed now.....well, after I steal a piece of Halloween candy out of the cupboard.

October 12, 2009

Quilt Class: Week 4

This is the Bow Tie pattern. You can do each quarter a different color or all the same, like I did. You can also turn each quarter square 90 degrees and have an "X" pattern instead of an "O". My first attempt at cheater corners too. I like them.

This is the Star in a Star pattern. I think this is my favorite square I've made and definitely my most accurate as far as measurements and lining up corners. Dare I say I'm starting to get the hang of it?....I wouldn't want to jinx myself. (knocking on wood repeatedly)

October 1, 2009

Toy Story Cake Across State Lines

Imitation is the sincerest form of flattery. My mom needed to make a cake for a Cub Scout cake auction fundraiser this week. She chose to make the Toy Story cake that I did a few weeks ago and it turned out really cute! I love the little yellow dots on the quilt and the headboard looks fantastic. This beautiful culinary confection sold at the auction for $157. Way to go, Mom! And way to go Cub Scouts!

September 30, 2009

Quirky Halloween Silhouettes


Aren't these Victorian silhouettes fun? I saw them on UCreate and had to make them for my home this Halloween. You can find the link to the images HERE at Value Village. Just print, frame, and enjoy. This took me about 10 minutes, with the longest part of the project being cleaning the glass on some existing picture frames and hanging them up straight. Definitely worth 10 minutes, I think.

I made beef stew for dinner.....

.....but I'm REALLY excited for dessert.

Chocolate ganache tart, find the recipe HERE. I added the raspberries.

Quilt Class: Week 3

This week was learning double nine and double four patches...along with the flying geese square. I didn't get very far as you can tell. This is the double nine patch. Well, actually it's four double nine patches put together....confused yet? I'm confused 83% of the time myself and I've been taking the class for 3 weeks! Hopefully, I'll be able to make the other squares and post them for you soon

September 23, 2009

Quilt Class: Week 2

This week was the log cabin square. I felt a lot more confident making this one than I did the first week. I'm still not entirely sure about my fabric choices, but it is starting to grow on me a bit. It's amazing how different the colors can look from night (artificial light) to day (natural sunlight). This looks much better in the natural light. I'm not really going to know if I like it or not until I see it with the rest of my sampler squares when I actually put the quilt together.

This was the alternative square for week 1, called the Roman Square. I decided to make it for the practice. Don't look too close, I've still got some learning to do....it's so hard to get everything EXACTLY measured and lined up correctly. Time and patience....and a lot of practice are all I need.

September 22, 2009

Kid's Art Porfolio Bag

A great little "portfolio" bag to store kids' art work. You need a paper bag, scissors, and some strong tape.

First, cut your bag down the middle of one side panel.

Cut the bottom of the bag off and discard. You will now have one long rectangular piece with the handles still attached at the top.

Fold the bag over so the writing is on the inside and line up your handles so they meet in the middle.

Tape along the bottom and one side and your artist portfolio is complete. I made one of these for each of the kids in my son's class. For our first art class, we decorated them with a monkey, the kids' name and any extra artwork they wanted to add. They loved them. Now, we're ready to begin making some art projects!

Related Posts with Thumbnails